Artists use colors, lines, and shapes to make art. Would you like to make art of your
own? Develop your creativity with these activities.
#1.Stencil Stampers
You can make your own stamps to use over and over. Use these
instructions to create your own greeting cards or wrapping paper.
You will need:
- Old sponges
- Scissors
- Poster or tempera paint
- Pans to hold the paint (old pie tins or baking pans that can be thrown away)
- Paper to paint on
- Water (for clean-up)
- Construction Paper
- Paper
1. Cut the sponges into the shapes you want.
2. Pour small amounts of paint into each pan.
3. Dip a sponge shape
into one of the pans. Place it where you want on the paper and press. You can use this same shape over and over or you can
add other shapes. Try other colors, too.
#2. Colors and Shapes Mobile
A mobile is a work of art that can move. Try making your own mobile. Your mobile may tell a story or be on a
subject that interests you . See the illustration for ideas.
You will need:
- 3 or 4 long plastic drinking straws
- Fastener
- Large needle
- thick thread or thin yarn cut into pieces of different lengths.
- cardboard
- paints
- crayons or markers
1. Thread the needle and tie a knot at the end of the thread. (Take care in using the needle.
Be sure an adult is around to help).
2. Use your needle to make a hole through the body of each straw and draw the thread
through the hole. This attaches all the straws together.
3. Cut the thread, but leave enough to hang the mobile.
4.
Cut out shapes from the cardboard and make a small hole in each of them.
5. Using thread, attach each shape to the
mobile. Move your shapes to different threads until your mobile has the right look.
#3. Making Dough Shapes -- DANIELLE 10-09-07
Would
you like to mold and shape dough into all kinds of different objects? The first step is to learn how to make the dough itself,
and it's easy to do.
You will need:
- 1 cup cornstarch
- 1 cup salt
- 1 1/2 cups flour
- water
- a mixing bowl
- a spoon
1. Put 1 cup of cornstarch, 1 cup of salt, and 1 1/2 cups of flour in the bowl.
2. Stir together.
3. Add 1/2 cup
of water and stir.
4. If the dough is still too stiff and dry add 1 or 2 spoonfuls of water and mix with your hands.
5.
Make something with your dough. Here are some ideas: a bowl, an animal, a building, or a person.
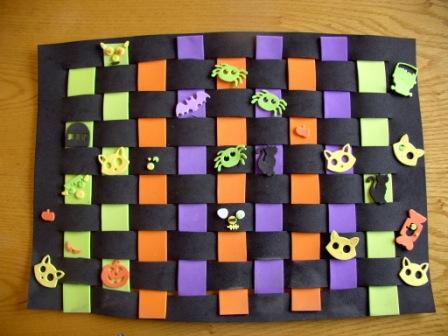
#4. Weaving Color Patterns --- JONI (10-2-07)
You will need:
- Sheets of different-colored paper (construction paper works well)
- Scissors
- Ruler
- Clear tape
- A pencil
1. Use the ruler to draw lines on the colored paper.
2. Make spaces between the lines the width of the ruler.
3.
Cut the paper on the lines to make strips.
4. Lay eight or more strips of the same color next to each other.
5. Tape
them together very close the top.
6. Take eight strips of another color.
7. One at a time, weave the strips in and out,
of the first colored strips.
8. If you started at the top for the first row of weaving, start at the bottom for the
next one.
9. After you have woven all the strips, cut the extra edges and tape them together.
10. Turn your finished
weaving over to see how it looks without the tape showing.
#5. A RAINBOW OF COLORS -- REBECCA (09-4-07)
We are going to use frosting instead of paint.
You can learn how to mix your own colors while making
your own painting. You can start with only three colors: red, blue, and yellow. These are called primary colors.
You will need:
· Poster
paint of tempera in red, blue and yellow
· Paper
cups
· A
paintbrush
· Paper
· A
teaspoon
1. Mix your three primary colors to form other
colors. Follow this guide when you are ready to mix a color.
· Red
+ blue = purple
· Blue
+ yellow = greenYellow + red = orange
· Red
+ blue + yellow = brown
Use black and white paint to make more colors.
· Red
+ white = pink
· Blue
+ black = dark blue
2. Try some more combinations. What colors
can you make?
3. Put 2 teaspoons of each of the colors you need
in a cup and stir.
4. Now you are ready to paint.
#6. YARN PAINTING -- DANIELLE (9-18-07)
Yarn paintings are a beautiful way to combine colors and shapes. Many yarn paintings are of animals or flowers.
Choose your own subject for your yarn painting. Maybe you will combine animals and flowers. Or maybe your yarn
painting will be of a big tree that exists only in your imagination.
You will need:
- A piece of cardboard
- A fine-tip pen
- Different colors of yarn or string
- Scissors
- Glue
- Make an outline of your painting on the cardboard.
- Cover the outline with white glue.
- Press a piece of yarn into the glue on the outline.
- Fill in small areas with glue and then the yarn, using your fingers and scissors to press the yarn pieces tightly together.
Always work from the outside in winding your yarn so it fills in the spaces in the outline.
- Let the glue dry and display your painting.
|